Definitions
Anderson Connector
The blue plug connection the charger output to the battery pack.
Battery
One US-8VGC battery, 8VDC with 170Ah(c/20) storage. All batteries are oriented such that the positive terminal is to the front of the vehicle.
CircuitBreaker
Located under the hood.
3 160VDC circuit breakers ganged together. Large black switch that has green on label and red off label
CircuitBreakerIn
Located under the hood.
The ganged circuit breaker terminal to the firewall and the passenger side.
CircuitBreakerOut
Located under the hood.
The ganged circuit breaker terminal to the front of the vehicle and the drivers side.
Controller
Located under the hood.
The computer that modifies the DC voltage to 3-phase AC for the motor. Has a large heat sink and two fans on top.
ControllerNegativeTerminal
Located under the hood, on the front of the controller.
The negative input wire connection to the controller.
ControllerNegativeTerminal
Located under the hood, on the front of the controller.
The positive input wire connection to the controller.
ControllerNegativeWiringPath
Involves components both in the bed and under the hood.
MostNegativeBattery to “ShuntIn”
“ShuntOut” to “ControllerNegativeTerminal”
ControllerPositiveWiringPath
Involves components both in the bed and under the hood.
“SecondMostPositiveTerminal” to “SecondMostNegativeTerminal”
“MostPositiveTerminal” to “CircuitBreakerIn”
“CircuitBreakerOut” to “ControllerPositiveTerminal”
HV
High Voltage. Describing components in the 320VDC wiring system.
HVAmmeter
Located in cab, to the left of the driver. Most drivers side gauge.
Measures the instantaious current that is flowing to the controller from the HV battery pack.
HVVoltmeter
Located in cab, to the left of the driver. Second most drivers side gauge. Measures the instainous voltage of the HV battery pack. In effect, a fuel gauge.
LV
Low voltage. Describing components in the 12V wiring system.
LVAmmeter
Located in the cab, in the bottom center right forward of the gear shift.
Measures the instanious current draw on the 12V battery.
LVVoltmeter
Located in the cab, in the bottom center right forward of the gear shift.
Measures the instaitiouns voltage of the 12V battery.
MostNegativeBattery
Located in the bed.
The rear-most battery in back of the bed, to the passenger side.
MostNegativeTerminal
The negative terminal on the MostNegativeBattery.
MostPositiveBattery
Located under the hood.
The battery on the passenger side under the hood.
MostPositiveTerminal
The positive terminal of the MostPositiveBattery.
SecondMostNegativeBattery
Located under the hood.
The battery to the drivers side under the hood.
SecondMostNegativeTerminal
The negative terminal of the SecondMostNegativeBattery.
SecondMostPositiveBattery
Located in the bed.
The forward most battery in the bed, to the drivers side.
SecondMostPositiveTerminal
The positive terminal of the SecondMostPositiveBattery.
Shunt
Located under the hood.
The H-shaped brass element, bolted under the hood to the upper firewall directly in front of the driver. Has a number of
ShuntIn
Located under the hood.
The passenger side bolt of the shunt, and the associated connections.
ShuntOut
Located under the hood.
The drivers side bolt of the shunt, and the associated connections.
TerminalCover
Located in the bed and under the hood.
Two per battery, they are PVC covers that are glued over the exposed lead battery terminals.
Thursday, December 20, 2007
Friday, December 14, 2007
Dec 14: Final Day
Dec 14, 2007, Tasks Accomplished:
- Had my Mother drive the car around.
- Picked up my Mother's friend Joyce, and she drove the EV.
- (Everyone wants one now)
- Drove the 35 miles back to Fairfield
- Had a local newspaper interview, and gave the reporter a ride.
- Pluged in the charger.
- Packed up clothes and tools.
- Did final bills.
- Did final directions.
Thursday, December 13, 2007
Dec 13: Finishing up
Dec 13, 2007, Tasks Accomplished:
- Finished packing up tools and cleaning up garage.
- Drove the 35 miles to GF.
- Gave Julie and her coworker Nora rides.
- Got good coffee.
- Met with Roland, the GF EV'er.
- Gave Jay, a friend from a bodyshop, a ride.
- Set up for a 110V overnight charge in my mom's garage.
Dec 12: Drive
Dec 12, 2007, Tasks Accomplished:
All the noise you hear is the crunching of the cold snow, and the Montana winter wind.
- Checked batteries for charge and charger.
- Made and installed cover for shunt.
- Started packing up tools.
- Checked the 110V charge setup.
- Drove. Had trouble with old 12V starting battery.
- Bought and installed new 12V deep cycle battery.
All the noise you hear is the crunching of the cold snow, and the Montana winter wind.
Wednesday, December 5, 2007
Dec 5: Testing heater
Dec 5, 2007, Tasks Accomplished:
- Tested heater core in place.
- Heater core checks out.
- Got two new 160VDC breakers and wired and mounted.
- John finished running wires for charging circuit.
- Reinstalled heat ductwork.
- Decided on positions of new gauges.
- Wired 320V gauges.
- Started dash install.
Tuesday, December 4, 2007
Dec 4: Damn Fan
Dec 4, 2007, Tasks Accomplished:
- Worked on fan wiring.
- Rewired new fuse and hot wire for fan relay.
- Got fan working properly.
- Added wiring for heater relay activation circuit.
Monday, December 3, 2007
Dec 3: Fan problems
Dec 3, 2007, Tasks Accomplished:
- Drove back from GF.
- Installed and did final heater core wireing.
- Installed heater core, with new electric elements.
- Found out the fan didn't work.
- Started to try and fix fan.
- Read the Toyota manual fro the fna (blower) wiring diagrams.
Saturday, November 3, 2007
Nov 3: Drove to Seattle (pic)
Drove back to Seattle to wait for a charger. A guy just outside of Seattle is building the charger, and we need a few more parts (that ElectroAutomotive was supposed to supply). Specifically, we need a ammeter and shunt, and a DC-DC converter. We have already purchased them from ElectroAutomotive, but I have decided to order them from someone around Seattle, get all the parts collected, then drive back to Montana and finish up the project. We'll deal with the money later. The next posting will be "driving back to Montana".

You see, this was the first big trip for the BMW since I got it running fairly well, that's why there are so many pictures of it.

It's now back in its driveway in Seattle.

You see, this was the first big trip for the BMW since I got it running fairly well, that's why there are so many pictures of it.

It's now back in its driveway in Seattle.
Friday, November 2, 2007
Nov 2: It Runs! (pic)
Nov 2, 2007, Tasks Accomplished:
- Redid all the ground straps
- Added a chassis to frame ground
- Changed a parameter in the DMOC
- Got it running! (thanks to Matt, Tim, and Beth)
- Drove it and weighed it
- Gave rides to friends
Rereading the manual for directions.

The motor actually turns now.

Pretty cool. The laptop is hooked up to the controller by a cable I ran through one of the old heater core hose holes in the firewall (just temporally). The computer then can display the motor RPM, the pedal position, the requested motor torque, among other things. It's pretty advanced! You can also use the laptop to change the parameters in the DMOC controller, which then modifies the performance of the vehicle, and which we had to do to get it working.

It left the garage under its own power. My first drive in an EV!

Yep, a few batteries.

I'm heading to Seattle tomorrow in my new racer.

We went by my dads to give him a ride too.

My dad and I driving off.

And returning.

We can't drive far, as we have no charger, even though John and Julie payed for one in the middle of August. Again, I would not recommend doing business with ElectroAutomotive. We have actually now ordered a different charger from a guy outside of Seattle, who seems to make a real good product and said he will have it finished in 10-20 days.

John drove his new car too, I just didn't get a photo of it.
Thursday, November 1, 2007
Nov 1: Start Car?
Nov 1, 2007, Tasks Accomplished:
- Hooked up batteries front to back
- Started on insulating individual terminals
- Changed solenoid to interrupt positive
- Checked Potbox
- Tried to start car (didn't work)
- Copied control parameters onto computer and hooked up laptop computer to DMOC
- Got information, checked manual, and emailed questions
- Reread manual
Wednesday, October 31, 2007
Oct 31: All Batteries
Oct 31, 2007, Tasks Accomplished:
- Installed fuse in front pack
- Crimped final ends on long runs of #2 cable
- Wired front batteries
- Got low pressure power steering hose installed
- Filled and tested power steering system
- Wired DMOC
- Got PotBox throttle working and wired
Tuesday, October 30, 2007
Oct 30: Controller Wires
Oct 30, 2007, Tasks Accomplished:
- Reread controller manual and wiring diagrams
- Sorted controller (DMOC) wiring loom
- Got high pressure power steering hoses installed
- Went to GF
- Got another large fuse, power steering fluid, and work light
Monday, October 29, 2007
Oct 29: Low Voltage Wire
Oct 29, 2007, Tasks Accomplished:
- Decided to order charger from a guy outside Seattle, get EV running, weigh it, then go to Seattle and wait for charger
- Wired
- Finished wiring air vacuum pump
- Ordered new charger
- Installed vacuum hoses on brakes
Sunday, October 28, 2007
Oct 28: No EV Work (pic)
Still goofed with paint, and talked through possible options for the charger. A guy outside Seattle makes one...

Went to check out my dad's old cabin that I bought from him.

For a very good price!

Thank you dad!


Went to check out my dad's old cabin that I bought from him.

For a very good price!

Thank you dad!

Saturday, October 27, 2007
Oct 27: Saturday (pic)
Did nothing on the EV, just worried about the charger.

How is it that we could we be informed now, two and a half months after placing and paying for the order, that some guy sold us something he doesn't have and can't get.

And a piece that is absolutely essential for the success of the project.

I painted my car to amuse myself, and my dad and I went to a Halloween party.

Friday, October 26, 2007
Oct 26: Charger Help?
Oct 26, 2007, Tasks Accomplished:
- Emailed about a charger
- Emailed more about chargers, thanks SEVA people
- Called about charger
- Drove back
- Started low-voltage wiring
- Reinstalled power brake air pump with proper feet and hardware
Thursday, October 25, 2007
Oct 25: Charger Email!
Oct 25, 2007, Tasks Accomplished:
- Cleaned up tools and garage
- Uninstalled power steering vacuum pump
- Measured for screws and wire
- Build electrical wiring table
- Went to GF for shopping and email
- Got email from ElectroAutomotive that they cannot supply the charger they promised (that ruined my day!)
Wednesday, October 24, 2007
Oct 24: Plexiglass
Oct 24, 2007, Tasks Accomplished:
- Finished plexiglass mount for electrical
- Glued two pieces of plexiglass together
- Painted and installed vacuum canister and mount
- Worked on bed to hood wiring
- Made 12V battery negative to chassis ground and hooked up
- Tested some body electrical (lights, horn, etc.)
- Started vacuum routing
- Made shopping list for GF
Tuesday, October 23, 2007
Oct 23: Controller In
Oct 23, 2007, Tasks Accomplished:
- Installed fuse in middle of bed-battery pack
- Sized rear tires, maybe 225/65R15, load 96
- Installed bracket and tray for controller
- Installed controller
- Made bracket for vacuum brake canister
- Installed front batteries and started to wire
- Started on electrical plexiglass tray for low-voltage connections
- Worked on bed to hood wiring
Monday, October 22, 2007
Oct 22: Got Shrinkwrap!
Oct 22, 2007, Tasks Accomplished:
- Finished bracket support for controller
- Painted controller support and brace
- Received shrink-wrap (another idem we ordered from ElectroAuto, did not receive, and eventually bought from someone else)
- Removed all battery cables and applied shrink-wrap
- reinstalled battery cables
- Connected power steering hoses
- John put on old rear tires
- Mounted air pump for brakes
Sunday, October 21, 2007
Oct 21: Drove back
Drove back from Spokane. The quick weld fix on the rusty exhaust bracket failed on the return drive.
Saturday, October 20, 2007
Friday, October 19, 2007
Oct 19: Torsional Support
Oct 19, 2007, Tasks Accomplished:
- Made support for front battery tray to add torsional support
- Drove to Spokane to see my aunt
Thursday, October 18, 2007
Oct 18: Reinstalling
Oct 18, 2007, Tasks Accomplished:
- Installed Driveshaft
- Picked up tires in GF
- Installed frame brace
- Zip-tied air suspension hosing
- Fashioned two brackets for rear brake lines (needed to move 1/2" because of air suspension)
- Welded and measured rack for controller
Wednesday, October 17, 2007
Oct 17: Air Is In!
Oct 17, 2007, Tasks Accomplished:
- Installed and tested air suspension
- Finished battery hold-down
- Primed and painted battery hold-down
- Installed power steering pump, resivor, and front batteries on new battery tray
- measured for controller
Tuesday, October 16, 2007
Oct 16: Air Suspension
Oct 16, 2007, Tasks Accomplished:
- Welded brackets for all-thread for front battery hold-downs
- Welded mounting for power steering
- Air suspension was delivered today
Monday, October 15, 2007
Oct 15: Front Batteries
Oct 15, 2007, Tasks Accomplished:
- Cut and welded tray for front four batteries
- Installed clutch slave and tested
- John worked on speaker covers
- Painted front battery tray
- Started to cut and weld front battery hold-down
Sunday, October 14, 2007
Oct 14: Relax
Watched football, then drove back from Bozeman. That 1970 is doing well getting me around!
Saturday, October 13, 2007
Friday, October 12, 2007
Oct 12: Motor in!
Oct 12, 2007, Tasks Accomplished:
- Moved truck out of garage
- Bolted motor mounts to motor
- Put motor in
- Tightened motor mounts to motor, motor mounts to frame, and tranmission mounts
- Went to Bozeman to hang out and drink beer with Blake.
Motor is in, and it fits!
Thursday, October 11, 2007
Oct 11: Motor Mounts
Oct 11, 2007, Tasks Accomplished:
- Left GF
- Bolted transmission to motor with proper hardware
- Cut pieces for motor mounts
- Drilled motor mount holes
- Tack welded motor mounts
- Tested, then welded motor mounts
- Ground and painted mounts
- Welded exhaust hanger on BMW
Wednesday, October 10, 2007
Oct 10: Motor to Tranny
Oct 10, 2007, Tasks Accomplished:
- Got loctite
- Mounted flywheel
- Mounted clutch and pressure plate
- Mounted motor to transmission
- Measured for metal for engine mounts, under-hood batteries, etc.
- Went to GF for metal, shrink-wrap online, hardware for motor mounts, hardware for transmission to motor
Tuesday, October 9, 2007
Oct 9: ADAPTOR PLATE
Oct 9, 2007, Tasks Accomplished:
- Fixed lawnmower
- Ordered fuses and proper fuse block
- Ordered circuit breaker
- FINALLY RECEIVED ADAPTOR PLATE
- Redrilled holes on adaptor plate
- Removed clutch and flywheel
- Mounted Flywheel to electric motor
- Built puller for spline shaft
- Need to get loctite tomorrow
Finally got the adaptor plate for ElectroAutomotive. It was supposed to be delivered a month after we ordered, and we ordered and Julie and John payed in full on August 13th. This has been holding us up, as it is needed to put the motor in. Only after we get the motor in can we place the controlled and the batteries and start to wire. We have it now, though, so we can get to work.
Monday, October 8, 2007
Oct 8: Conduit
Oct 8, 2007, Tasks Accomplished:
- Emailed about fuse sizing and circuit breaker sizing
- Worked on conduit from bed to engine compartment
- Installed fuse
Sunday, October 7, 2007
Oct 7: Stayed in GF (pic)
Oct 7, 2007, Tasks Accomplished:
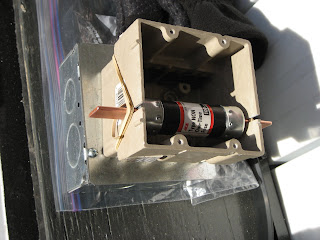
- Bought fuse and junction box
- Emailed about fuse sizing
- Started copying these daily lists into computer
- Fashioned 240VAC 100A fuse as temporary solution

Saturday, October 6, 2007
Oct 6: GF Shopping
Oct 6, 2007, Tasks Accomplished:
- Went to GF
- Bought junction box and plastic grates
- Looked for fuses online
- Uploaded photos
Friday, October 5, 2007
Oct 5: Start High Voltage
Oct 5, 2007, Tasks Accomplished:
- Wired batteries in bed
- Bought conduit, nuts, bolts
- Put rear suspension back together with old shackles
- Ordered air suspension
- Looked and circuit breakers and fuses online
Thursday, October 4, 2007
Oct 4: Shackles Still
Oct 4, 2007, Tasks Accomplished:
- Went to GF
- Bought new bolts for new spring shackles
- Priced air suspension
- Emailed
I had originally planned on adding air suspension to the rear, but was trying to get by with modifications to the existing springs. Looks like we will add air suspension also, as there is quite a bit of weight back there.
Wednesday, October 3, 2007
Oct 3: New Spring Shackles (pic)
Oct 3, 2007, Tasks Accomplished:

- Suspension work
- Started to cut new rear spring shackles
- Went to GF for new jacks and stands
- Ground new shackles
- Drilled shackles

Tuesday, October 2, 2007
Oct 2: Finish Hold-down
Oct 2, 2007, Tasks Accomplished:
- Finished welds on battery hold-downs
- Revamped suspension by swapping the order of the leafs in the rear packs
- Cut down all-thread
- Welded bolts on all-thread and installed
- Spray painted channel-iron runners
Monday, October 1, 2007
Oct 1: Batteries in Bed
Oct 1, 2007, Tasks Accomplished:
- Moved batteries off rubber bed mat
- Installed rubber mat in bed
- Installed bed battery tray in bed
- Moved 36 batteries into position in bed
- Installed new battery hold-down
- Installed new all-thread, bolts, and nuts
- Cut two long steel runners, welded, and installed
- Drilled two cross-runners and installed
- John worked on speakers
- Replaced driver's side rear wheel cylinder
Sunday, September 30, 2007
Sept 30: Email (pic)
Sept 30, 2007, Tasks Accomplished:
Uploading pictures onto the internet and emailing ElectroAutomotive about lacking parts. Wouldn't recommend doing business with them, unless you have forever to wait.
Got the new vent pipe installed on my dad's new water heater. Looks good.
The following picture is the pair of 90's I added to the pipes. The pipes had been forced into an angled connection, which finally started leaking. The connections are no longer under stress. And, if you look back at the prior pictures, you will notice that the burn marks on the joist were there before I started working on the tank (though, I have charred wood other times when sweat soldering, just not this time).
- Went to GF
- Got new vent pipe for water heater
- Emailed ElectroAutomotive about lack of parts, specifically the adaptor, which is now needed
- Uploaded pictures onto Flickr
- Installed new vent pipe on new water heater
Uploading pictures onto the internet and emailing ElectroAutomotive about lacking parts. Wouldn't recommend doing business with them, unless you have forever to wait.

Got the new vent pipe installed on my dad's new water heater. Looks good.

The following picture is the pair of 90's I added to the pipes. The pipes had been forced into an angled connection, which finally started leaking. The connections are no longer under stress. And, if you look back at the prior pictures, you will notice that the burn marks on the joist were there before I started working on the tank (though, I have charred wood other times when sweat soldering, just not this time).

Saturday, September 29, 2007
Sept 29: Water Heater (pic)
Sept 29, 2007, Tasks Accomplished:
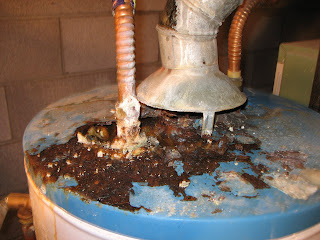

Notice, in the following picture, that the pipes go up to a T that is leaking. The soldered connection has gone bad, as there is stress on the connection. The pipe to the right is inches above the connection to the left. This will have to be remedied.

The new connections and new valve.

Section cut out and a 90 added.

For some reason I didn't take a picture of the finished product. You can see some pictures on the next page, though.
- Replaced my dad's old water heater
- Relaxed, and drank a few beers with my dad


Notice, in the following picture, that the pipes go up to a T that is leaking. The soldered connection has gone bad, as there is stress on the connection. The pipe to the right is inches above the connection to the left. This will have to be remedied.

The new connections and new valve.

Section cut out and a 90 added.

For some reason I didn't take a picture of the finished product. You can see some pictures on the next page, though.
Friday, September 28, 2007
Sept 28: Finishing Hold-down
Sept 28, 2007, Tasks Accomplished:
- Finished cutting and welding bed battery frame (with the exception of long cross pieces
- Painted top side of bed battery tray
- Spray painted battery hold-down
Thursday, September 27, 2007
Sept 27: Battery Hold-down
Sept 27, 2007, Tasks Accomplished:
- Got bolts and all-tread in GF last night
- Picked up steel in GF in the morning
- Drove
- Cut and welded on the battery hold-down frame
- Painted second coat on the bottom of the bed battery tray
- Julie picked up used shock bushings from muffler shop for bed battery all-thread rubber washers
Wednesday, September 26, 2007
Sept 26: Two Weeks
Sept 26, 2007, Tasks Accomplished:
- Painted underside of bed battery tray
- Spray painted aluminum on bed battery tray
- Made, glued, and screwed four plywood corner gussets
- Started lawnmower
- Welded bird feeder hangers
- Stacked batteries in final shape and taped all positive terminals
- Started welding outside of bed battery hold-downs
- Went to GF for steel, bolts, etc.
Tuesday, September 25, 2007
Sept 25: Batteries Arrive!
Sept 25, 2007, Tasks Accomplished:
- Got batteries
- Unloaded batteries
- Tested geometry for plywood bed battery tray
- Fixed geometry (batteries taper a base, who knew?)
- Added more bolts to battery tray, as planned
- Welded lawnmower deck
- Received wires (only) from ElectroAutomotive
- Caulked trim on battery tray
Monday, September 24, 2007
Sept 24: Grinding and Welding
Sept 24, 2007, Tasks Accomplished:
- Finished fabricating front bed battery hold-downs
- Ground smooth edges on brackets
- Clamped brackets in position, then removed bed
- Sanded then welded brackets
- removed engine mounts from engine
- Cleaned engine mounts and installed on tool (wood jig)
- Leveled tool
- Painted new flange brackets
- Reinstalled bed
Sunday, September 23, 2007
Sept 23: Email (pic)
Sept 23, 2007, Tasks Accomplished:
- Went to GF for fast internet access
- Emailed and loaded pictures onto internet

Saturday, September 22, 2007
Sept 22: Battery Tray
Sept 22, 2007, Tasks Accomplished:
- Drilled all-thread holes for battery hold-downs
- Threaded and sized rear all-thread, goes through original bed to frame mounting flange.
- Drilled front all-thread holes
- Drilled and rough-cut frame flanges for front two bed battery hold-down
Friday, September 21, 2007
Sept 21: Starting Battery Tray
Sept 21, 2007, Tasks Accomplished:
- Installed bed mat
- Cut plywood for bed battery tray
- Cut, drilled, and installed aluminum battery edging
- Talked about tires, should get estimate on Monday
- Moved truck around (to access bed)
- Bought bolts for battery hold-downs
Thursday, September 20, 2007
Sept 20: Motor Arrives
Sept 20, 2007, Tasks Accomplished:
- Got more insulation glue
- Got taillight wiring connector
- Glued rest of under bed insulation
- Put bed on
- Wired taillights
- Picked up motor and controller
- Emailed ElectroAutomotive about parts
- Bought rubber bed mat
- Bought new multimeter
Wednesday, September 19, 2007
Sept 19: Insulation
Sept 19, 2007, Tasks Accomplished:
- Bought 2" foam insulation, plywood, screws, 2x4's, expanding spray foam, foam glue
- Cut and formed under-bed insulation
- Glued Some insulation
- Glued heater box
- Glued pads for frame to bed box
- Removed interior carpet
- Talked to motor shipper, motor arrives tomorrow
Tuesday, September 18, 2007
Sept 18: Bed Work
Sept 18, 2007, Tasks Accomplished:
- Final coat of paint on interior of bed
- Removed and dissembled heater box
- Bought 2 new 110VAC 1500W ceramic heaters
- Dissembled heaters and modified heater core for electric heat
- Installed rear brakes
- RTV'd underside of bed
- Measured insulation for underside of bed
Monday, September 17, 2007
Sept 17: Bed Work
Sept 17, 2007, Tasks Accomplished:
- Ordered rear brakes
- Bought bolt for rear shock and installed
- Sanded and painted inside of bed
- Straightened dents out of bed
- Painted 12V battery tray
- Removed seats
- Removed bottom of dash
- Removed heater core
- Painted tailgate
- Sealed holes in bed with RTV silicone
Sunday, September 16, 2007
Sept 16: Start Rear Suspension
Sept 16, 2007, Tasks Accomplished:
- Jacked up and blocked rear end
- Removed, pounded, and reinstalled rear bumper
- Added helper leaf
- Replaced rear shocks
- Removed tires and drums, inspected brakes, decided to replace rear brakes
- Front brakes are good
Saturday, September 15, 2007
Sept 15: Drove to Great Falls
Sept 15, 2007, Tasks Accomplished:
- Drove to Great Falls (GF), the closest city with a decent selection of parts
- Got shocks and new spring leaf
- Got more engine cleaner
- Got hand goop
Friday, September 14, 2007
Sept 14: Cleaning
Sept 14, 2007, Tasks Accomplished:
- Removed remainder of fuel lines
- removed heat shields under cab
- removed electrical coil and wiring
- Removed battery to starter wiring
- Soaped and powerwashed frame and engine compartment
- Powerwashed bed
Thursday, September 13, 2007
Sept 13: Engine Out
Sept 13, 2007, Tasks Accomplished:
- Head pipe removed
- Transmission mounting removed
- Frame crossmember removed
- Clutch slave disconnected
- Driveshaft removed
- Engine/transmission pulled
- Cleaned engine with degreaser
- Built cradle-jig for engine/transmission
- Separated engine from transmission
Wednesday, September 12, 2007
Sept 12: Starting Work (pic)
Sept 12, 2007, Tasks Accomplished:
First day of work! The following pictures cronical the initial day of the ICE component removal.


- Disconnected power steering pump from engine
- Disconnected AC pump from engine
- Disconnected wire loom from engine and transmission
- Drained oil and coolant
- Removed radiator
- Removed intake system
- Removed fuel tank and some fuel lines
- Disconnected coil
- Removed belts
- Removed gas tank
- Removed muffler and catalytic converter
First day of work! The following pictures cronical the initial day of the ICE component removal.


Tuesday, September 11, 2007
Sept 11: Seattle to Montana (pic)
Left Seattle to drive to Montana in my little 1970 BMW that I got from a friend's horse pasture a few years ago. It had been sitting in the pasture for fourteen years, a home for feral cats, rats, and marmots. We'll see if I make it.

The car this summer, looking better.


The car this summer, looking better.

Friday, August 31, 2007
The Donor Vehicle (pic)
The new Toyota! A 1990 bought from a student in Bozeman, Montana. Seems a bit of a waste to dissemble a properly working Toyota pickup. As one can see, there is a little body work that can be done, but that can wait until after we see if the project will be a success.
Flickr slideshow


Flickr slideshow


Thursday, August 30, 2007
Inital Project Planning (pic)
The call for an EV was simple. Some friends, Julie and John, already had a wind turbine that produced surplus electrical power and Julie had a round trip daily commute of about 90 miles. Consequently, they wanted an EV that would reliably do 90 highway miles in Montana, in all but the coldest of days.
There are none that are available. A RAV4 was sold on ebay awhile ago, that is a vehicle that can go 100+, but you can't get them. The Tesla would work too, and be quite stylish, but it is $100,000 and could not be had for over a year. The Neighborhood Electric Vehicles (NEV) cannot do the highway speeds required. The only viable option was a home conversion. After many conversations, it was decided there was a good chance we could do it, hence the EV conversion project.
The EV conversion project was planned over the summer of 2007. I was to do the planning, most of the legwork, and John and I would do the build. Julie and John were going to put up the funds, and own and use the vehicle in the end. It was decided to convert a Toyota Xtracab pickup into a long range EV by removing the internal combustion engine (ICE) components and adding a technologically advanced 3-phase AC motor and 40 lead-acid golf cart batteries. I was in the Peace Corps in Kenya a few years ago, where I gained great respect for the structural strength of Toyota pickups! Twenty people (me being one, at times) are regularly stuffed in the back of the already loaded Matau just like the one pictured below... our batteries will weigh less!

A 1990 Toyota was found and bought, and all major parts and batteries were purchased in the summer. The parts were scheduled to arrive in September, and the installation and conversion was to take place in Montana over the month of September.
Wednesday, August 29, 2007
Introduction
I decided to make a little blog to describe my Toyota Electric Vehicle (EV) conversion project. This blog is not yet complete, but it gives some amount of information about the project.
An initial disclaimer, though...
I am creating this blog 7 weeks into the project, in November 2007, as we are presently waiting for parts. Consequently, the dates of the posts are not accurate. I will simply backdate the posts to make them correspond to the event depicted and described.
Also, for now, I will just hyperlink most of the build pictures, as I have already uploaded them onto flickr. Just click on the "Flickr slideshow" on each post. After you open a linked slideshow, you can select "options" on the bottom right, then select "always show title and descriptions". I labeled most of the pictures, so if you select this, you will get a little information about each photo.
Anyway, enjoy, and here it goes...
Subscribe to:
Posts (Atom)